みなさん元気ですか?元気です。どうも、クラウドアーキテクトのワタナベです。
前回の記事で Azure Cloud Shell(以下、Cloud Shell)を利用した仮想マシンアクセスをご紹介しました。
今回は Cloud Shell からの仮想マシン接続を制御する方法について少し深掘りをしてご紹介します。
まず、前回の復習です。
前回の記事で仮想マシン接続の準備として、以下のコマンドを実行することをご紹介しました。
Enable-AzVMPSRemoting -Name “仮想マシン名” -ResourceGroupName “リソースグループ名”
※“仮想マシン名” と “リソースグループ名” はご自身の環境にあわせて設定してください。
こちらのコマンドを実行することで、Azure のリソースに対する変更と仮想マシンに対する変更が行われます。
Cloud Shell による仮想マシンへの接続を制御するためには、このコマンドによる変更を理解しておく必要があります。
「Enable-AzVMPSRemoting」 コマンドでは、対象の Azure リソースと仮想マシンに対して以下のような変更を加えています。
※ 仮想マシンが Windows の場合
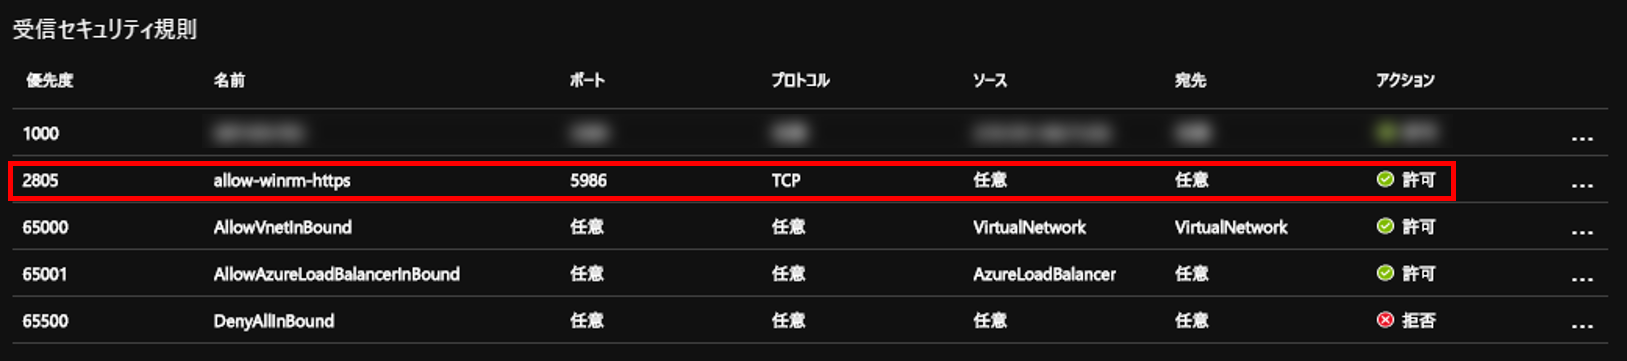
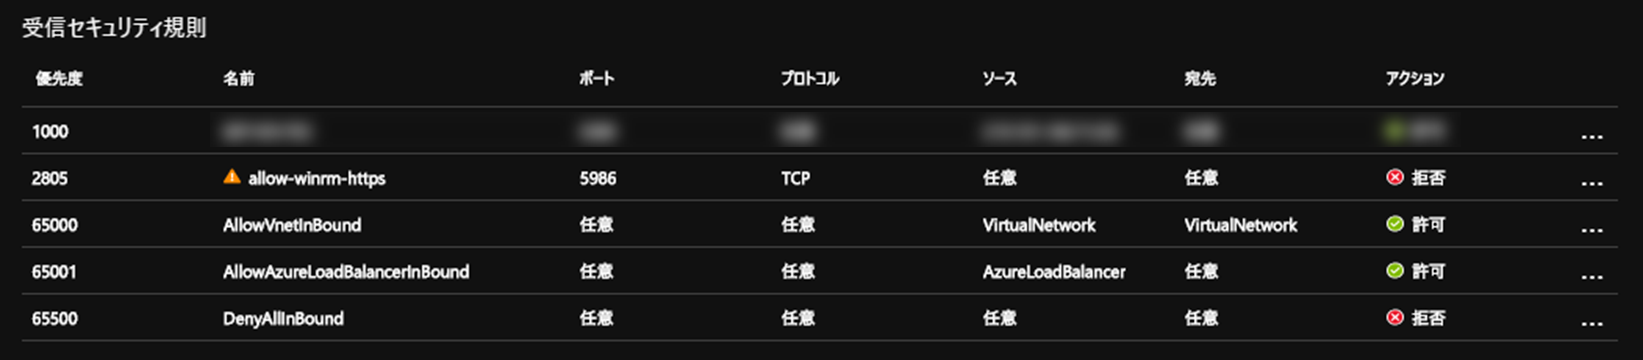
・対象の仮想マシンに関連する NSG の受信セキュリティ規則に対して、以下の通信許可設定を追加します。
左右にスクロールしてご覧ください。
| 名前 | ポート | プロトコル | ソース | 宛先 | アクション |
|---|---|---|---|---|---|
| allow-winrm-http | 5986 | TCP | 任意 | 任意 | 許可 |
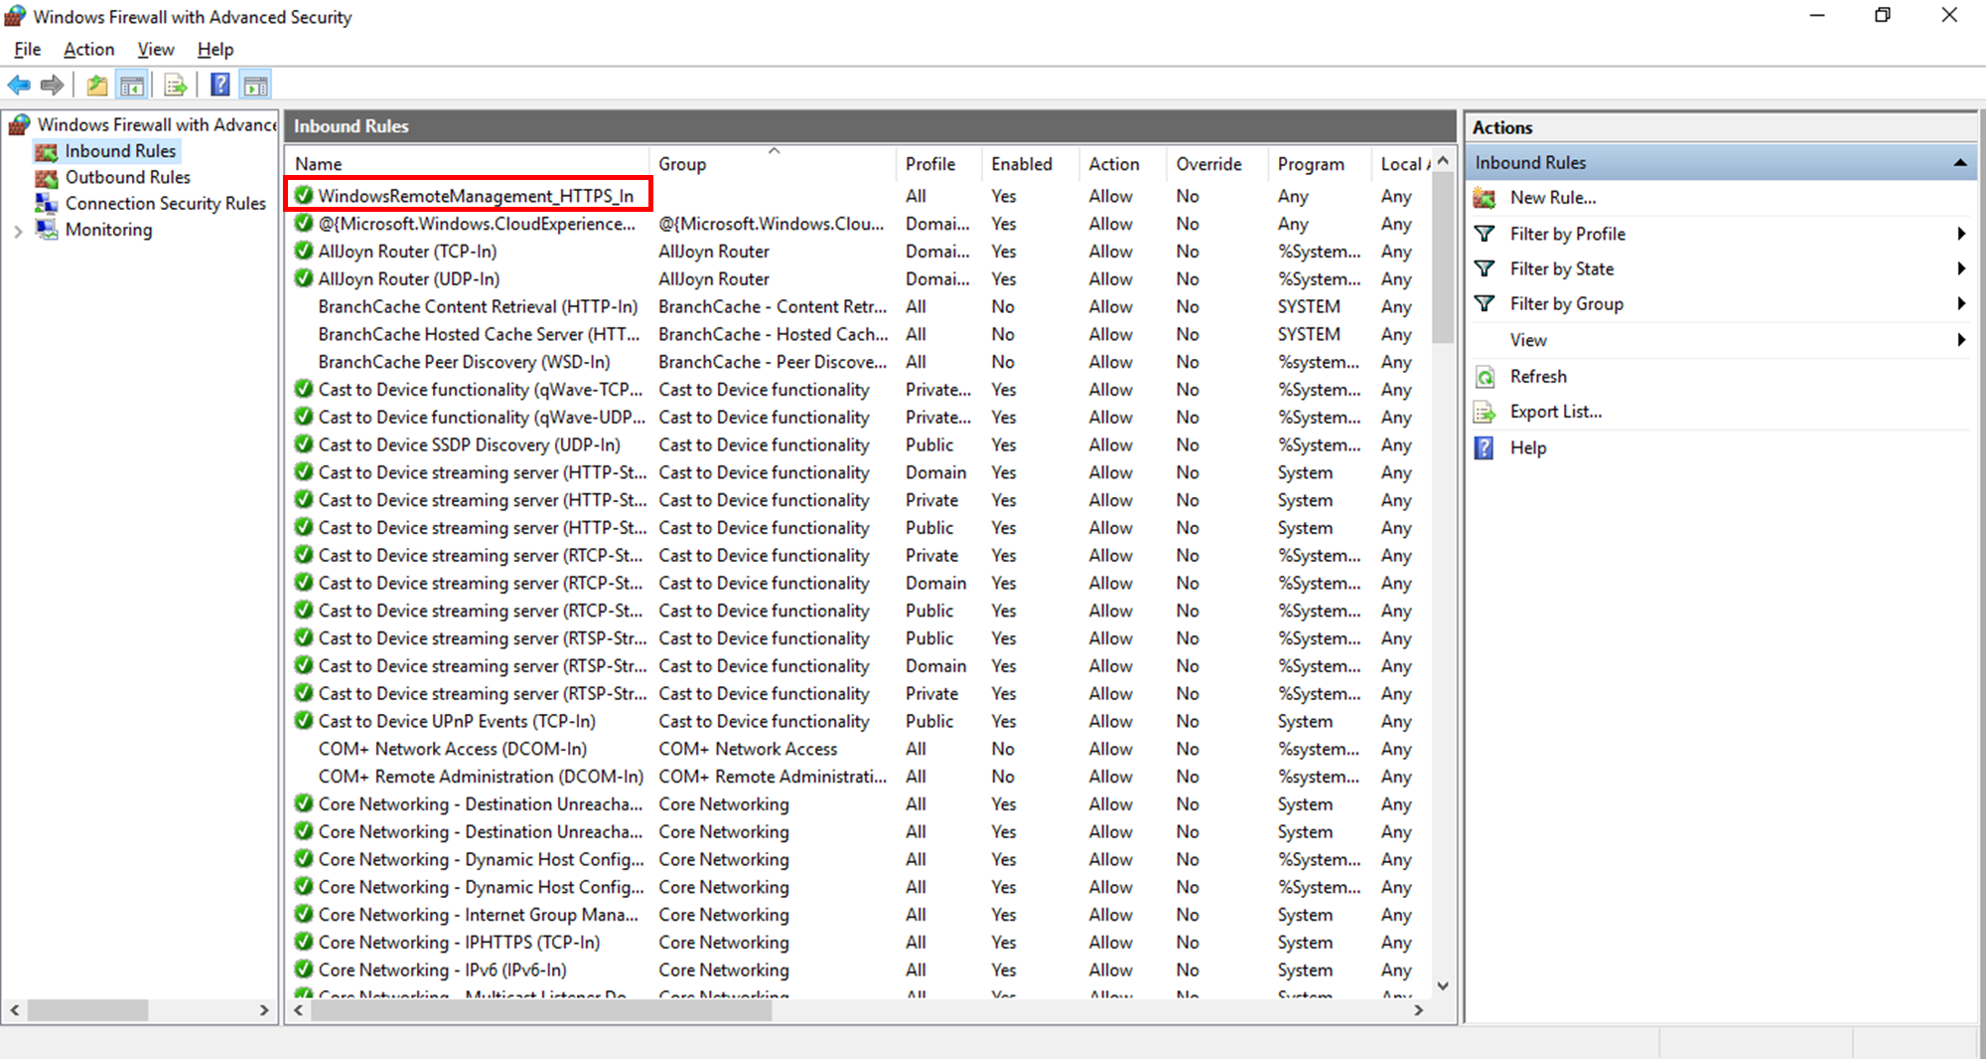
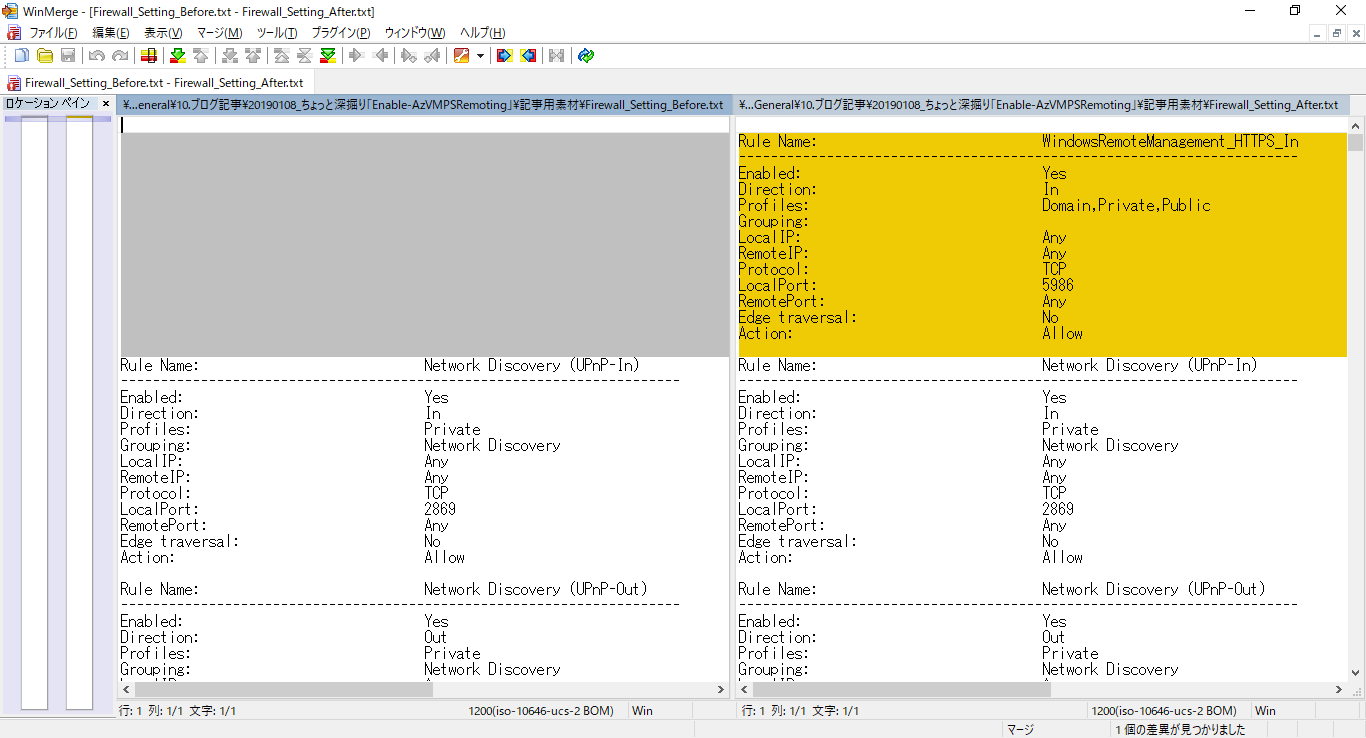
・対象の仮想マシンで WinRM を有効化し、Windows Firewall に「WindowsRemoteManagement_HTTPS_In」と言う名前で TCP ポート5986の通信を許可する設定を行います。
※WinRM は Windows Server 2012 以降のバージョンでは既定で有効です。
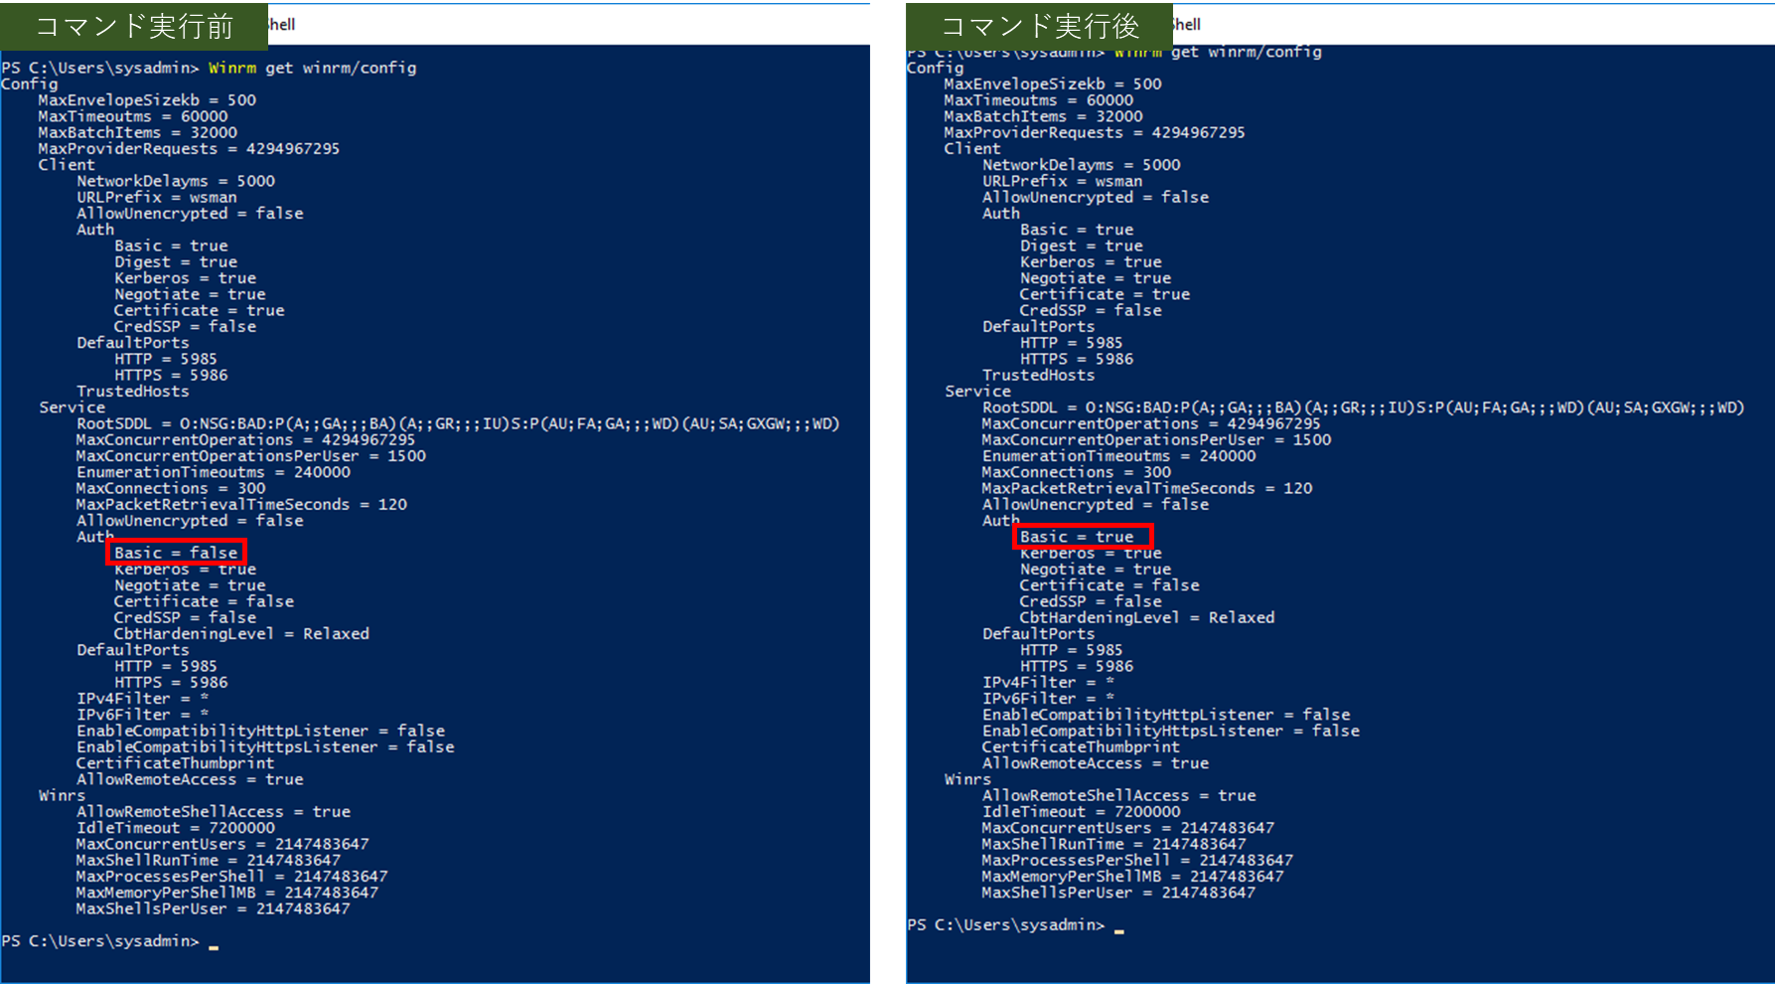
「Enable-AzVMPSRemoting」コマンド実行後 Basic 認証が有効になります。
Windows Firewall の受信規則に「WindowsRemoteManagement_HTTPS_In」という名前のルールが追加されています。
コマンド実行前の Firewall ルールとの比較を確認してみます。
また、「Enable-AzVMPSRemoting」の定義は以下のコマンドで確認できます。
Get-Command Enable-AzVMPSRemoting | Select-Object -ExpandProperty Definition
処理の内容が確認できます。
    <#
        .DESCRIPTION
        Enables the Azure PSRemoting

        .PARAMETER Name
        Specifies the computername

        .PARAMETER ResourceGroupName
        Provide the name of the resource group

        .PARAMETER Protocol
        Provide the type of Protocol for nsg rule setup - http/https/ssh

        .PARAMETER OsType
        Option of windows/linux

        .EXAMPLE
        Enable-AzVMPSRemoting -Name vmName -ResourceGroup resourceGroup

        .EXAMPLE
        Enable-AzVMPSRemoting -Name vmName -ResourceGroup resourceGroup -OsType linux
    #>

    param
    (
        [Parameter(Mandatory, ValueFromPipelineByPropertyName)]
        [string]$Name,

        [Parameter(Mandatory, ValueFromPipelineByPropertyName)]
        [string]$ResourceGroupName,

        [ValidateSet('http','https','ssh')]
        [string]$Protocol,

        [ValidateSet('windows','linux')]
        [OSType]$OsType
    )

    # Since this is a standalone cmdlet and OsType is optional, it may not be supplied
    # So we make a REST call to retrieve the target OsType
    if (-not $OsType)
    {
        $OsType = Get-OsType -Name $Name -ResourceGroupName $ResourceGroupName
    }

    # Obtain all Network Security Groups associated with the VM (Interface level Nsg, Subnet Level Nsg)
    $azVMNsgs = Get-AzVmNsg -Name $Name -ResourceGroupName $ResourceGroupName

    $parameters = @{NetworkSecurityGroup = $null
                        Protocol = 'Tcp'
                        Direction = 'Inbound'
                        Access = 'Allow'
                        SourcePortRange = '*'
                        SourceAddressPrefix = '*'
                        DestinationAddressPrefix = '*'
                        Priority = (Get-Random -Minimum 100 -Maximum 4096)
        }

    $azureVM = Az.Compute\Get-AzVM -Name $Name -ResourceGroupName $ResourceGroupName

    if ([OStype]::Windows -eq $OsType)
    {
        if (-not $Protocol)
        {
            # Only WinRM_HTTPS protocol is supported for Windows Target
            $Protocol = 'https'
        }

        foreach ($azVMNsg in $azVMNsgs)
        {
            # Get PSRemoting status for a given Nsg
            $psremoting = Get-AzVMPSRemoting -Name $Name -ResourceGroupName $ResourceGroupName -Nsg $azVMNsg
            $parameters['NetworkSecurityGroup'] = $azVMNsg

            # If Https is not enabled, enable it
            if($Protocol -eq 'https')
            {
                if (-not $psremoting.Https)
                {
                    $null = Az.Network\Add-AzNetworkSecurityRuleConfig -Name 'allow-winrm-https' -DestinationPortRange 5986 @parameters | Az.Network\Set-AzNetworkSecurityGroup
                }

                # Setup WinRM HTTPS based remoting using Self-Signed Certificate
                $runCommandParameters =
                @{
                    commandId = 'RunPowerShellScript'
                    script =
                    @(
                        'Set-Item WSMan:\localhost\Service\Auth\Basic $true -Force;$selfSignedCert = New-SelfSignedCertificate -CertStoreLocation Cert:\LocalMachine\My -DnsName $env:COMPUTERNAME;Enable-PSRemoting -SkipNetworkProfileCheck -Force;Remove-Item -Path WSMan:\Localhost\listener\Listener* -Recurse -Force;New-Item -Path WSMan:\LocalHost\Listener -Transport HTTPS -Address * -CertificateThumbPrint $selfSignedCert.Thumbprint -Force;New-NetFirewallRule -DisplayName WindowsRemoteManagement_HTTPS_In -Name WindowsRemoteManagement_HTTPS_In -Profile Any -LocalPort 5986 -Protocol TCP -RemoteAddress Any;'
                    )
                }

                $null = Az.Resources\Invoke-AzResourceAction -ResourceId $azureVM.Id -Action runCommand -Parameters $runCommandParameters -ApiVersion 2017-03-30 -Force
            }

            # Future code path, if we support both http/https protocols for Windows target
            # If Http is not enabled, enable it
            if($Protocol -eq 'http')
            {
                if (-not $psremoting.Http)
                {
                    $null = Az.Network\Add-AzNetworkSecurityRuleConfig -Name 'allow-winrm-http' -DestinationPortRange 5985 @parameters | Az.Network\Set-AzNetworkSecurityGroup
                }

                ###################################################################
                # Enable PowerShell remoting on a target Windows computer
                ###################################################################

                # Enable-PSRemoting -Force
                # Enable-PSRemoting configures the computer to receive Windows PowerShell remote commands that are sent by using WSMan protocol
                # Enable-PSRemoting performs the following operations:
                # 1) Runs the Set-WSManQuickConfig cmdlet, to:
                #      Start the WinRM service.
                #      Set the startup type on the WinRM service to Automatic.
                #      Create a listener to accept requests on any IP address.
                #      Enable a firewall exception for WS-Management communications.
                #      Register the Microsoft.PowerShell and Microsoft.PowerShell.Workflow session configurations, if it they are not already registered.
                #      Register the Microsoft.PowerShell32 session configuration on 64-bit computers, if it is not already registered.
                #      Enable all session configurations.
                #      Change the security descriptor of all session configurations to allow remote access.
                # 2) Restart the WinRM service to make the preceding changes effective.

                # Set-ItemProperty -Path 'HKLM:\SOFTWARE\Microsoft\Windows\CurrentVersion\Policies\System' -Name  'LocalAccountTokenFilterPolicy' -Value 1 -Type DWord -Force
                # When using local computer account for remoting, UAC (User Account Control) does not allow access to WinRM service.
                # Setting LocalAccountTokenFilterPolicy to 1 ensures UAC filtering for local accounts is disabled and access to WinRM service is granted.
                # Side Note: When using domain account for remoting, this account needs to be a member of the remote computer Administrators group.

                $runCommandParameters =
                @{
                    commandId = 'RunPowerShellScript'
                    script =
                    @(
                        'Set-ItemProperty -Path HKLM:\SOFTWARE\Microsoft\Windows\CurrentVersion\Policies\System -Name LocalAccountTokenFilterPolicy -Value 1 -Type DWord -Force;Enable-PSRemoting -Force;Set-NetFirewallRule -Name WINRM-HTTP-In-TCP-PUBLIC -RemoteAddress Any;'
                    )
                }

                $null = Az.Resources\Invoke-AzResourceAction -ResourceId $azureVM.Id -Action runCommand -Parameters $runCommandParameters -ApiVersion 2017-03-30 -Force
            }
        }
    }
    elseif ([OStype]::Linux -eq $OsType)
    {
        if (-not $Protocol)
        {
            # Only SSH protocol is supported for Linux Target
            $Protocol = 'ssh'
        }

        foreach ($azVMNsg in $azVMNsgs)
        {
            # Get PSRemoting status for a given Nsg
            $psremoting = Get-AzVMPSRemoting -Name $Name -ResourceGroupName $ResourceGroupName -Nsg $azVMNsg
            $parameters['NetworkSecurityGroup'] = $azVMNsg

            # If SSH is not enabled, enable it
            if($Protocol -eq 'ssh')
            {
                if (-not $psremoting.ssh)
                {
                    $null = Az.Network\Add-AzNetworkSecurityRuleConfig -Name 'allow-ssh' -DestinationPortRange 22 @parameters | Az.Network\Set-AzNetworkSecurityGroup
                }

                # ThisRunCommand step does following:
                # 1) Install powershellcore in linux, if not already present
                # 2) backup current sshd_config, configure sshd_config to enable PasswordAuthentication, register powershell subsystem with ssh daemon
                # (#2 is required to support interactive username/password authentication over powershell-ssh)
                # 3) Restart the ssh daemon service to pick up the new config changes
                $runCommandParameters =
                @{
                    commandId = 'RunShellScript'
                    script =
                    @(
                        'sudo wget -q https://packages.microsoft.com/config/ubuntu/18.04/packages-microsoft-prod.deb;sudo dpkg -i packages-microsoft-prod.deb;sudo apt-get update;sudo apt-get install -y powershell;sshdconfigfile=/etc/ssh/sshd_config;sudo sed -re "s/^(\#)(PasswordAuthentication)([[:space:]]+)(.*)/\2\3\4/" -i.`date -I` "$sshdconfigfile";sudo sed -re "s/^(PasswordAuthentication)([[:space:]]+)no/\1\2yes/" -i.`date -I` "$sshdconfigfile";subsystem="Subsystem powershell /usr/bin/pwsh -sshs -NoLogo -NoProfile";sudo grep -qF -- "$subsystem" "$sshdconfigfile" || sudo echo "$subsystem" | sudo tee --append "$sshdconfigfile";sudo service sshd restart'
                    )
                }

                $null = Az.Resources\Invoke-AzResourceAction -ResourceId $azureVM.Id -Action runCommand -Parameters $runCommandParameters -ApiVersion 2017-03-30 -Force
            }
        }
    }
それでは、仮想マシンへの接続制御を検討します。
「Enable-AzVMPSRemoting」コマンドにより、NSG に WinRM の通信許可設定が追加されることがわかりました。
つまり、Cloud Shell では WinRM を利用して仮想マシンへ接続するということなのですが、TCP ポート5986宛ての通信を任意の宛先(ソース Any)に許可してしまう動作になります。
これはインターネット全体からの通信を受け入れる設定となるため、ネットワークセキュリティにおいて大きな不安要素となる可能性があります。
そこで、NSG に通信拒否の設定をしておくことで、仮想マシンへの接続制御ができないか確認をしてみます。
まず、既に NSG に設定されている「allow-winrm-https」という名前の受信セキュリティ規則のアクションを「許可」から「拒否」に変更します。
続いて、Cloud Shell で仮想マシンへの接続を試みます。
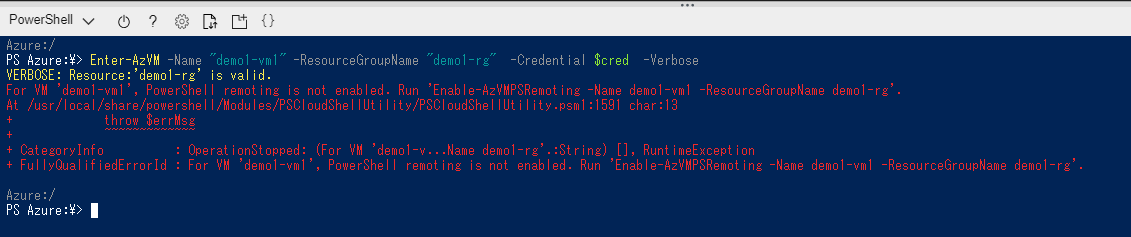
エラーになりました。
さらに、「Enable-AzVMPSRemoting」コマンドで NSG の設定が更新されないかを確認します。
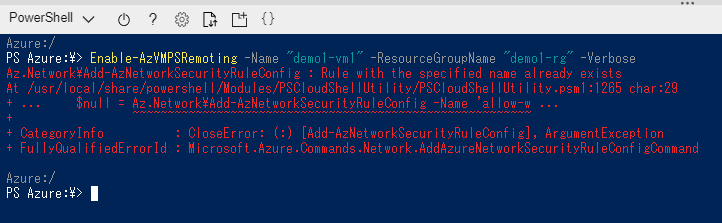
既に同名のルールが存在するため、「Rule with the specified name already exists」と表示されました。
NSG の設定の方も確認してみます。

アクションを「許可」に設定する等の変更は行われていませんでした。
これらの結果から、NSG で TCP ポート5986の通信拒否を設定することで、Cloud Shell を利用した仮想マシンへの接続を拒否できるとわかりました。
ただ、「allow-winrm-https」という名前の受信セキュリティ規則で「拒否」のアクションには違和感があります。
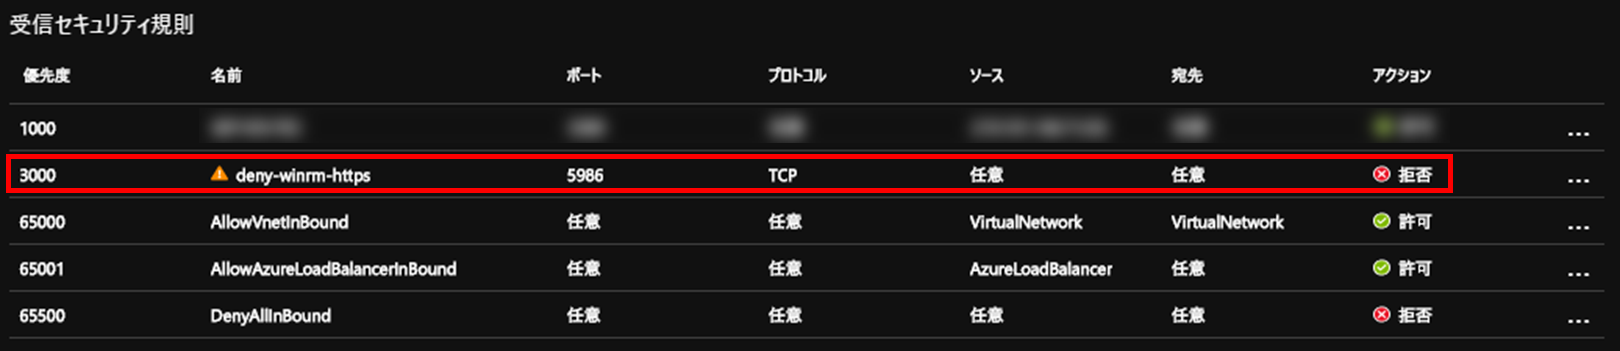
そこで、別の名前の受信セキュリティ規則(ここでは「deny-winrm-https」とします。)を作って動作を確認してみます。
まず「allow-winrm-https」を削除して、「deny-winrm-https」という名前の 受信セキュリティ規則を作ります。
続いて、「Enable-AzVMPSRemoting」コマンドで NSG の設定が更新されないかを確認します。

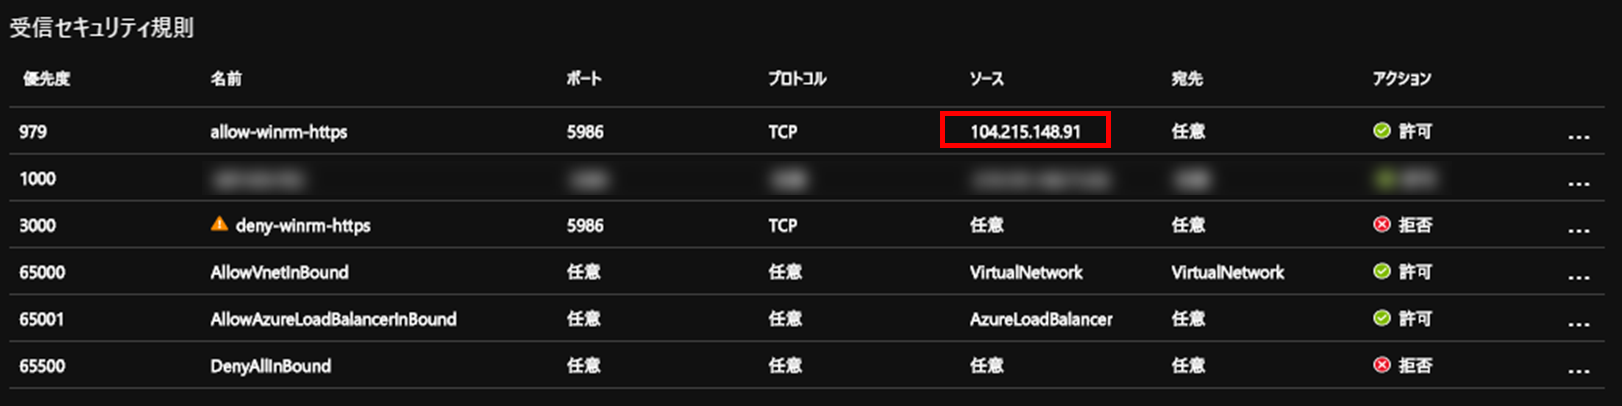
今度はエラーも警告も発生せずに終了しました。実際の NSG の設定を確認してみます。
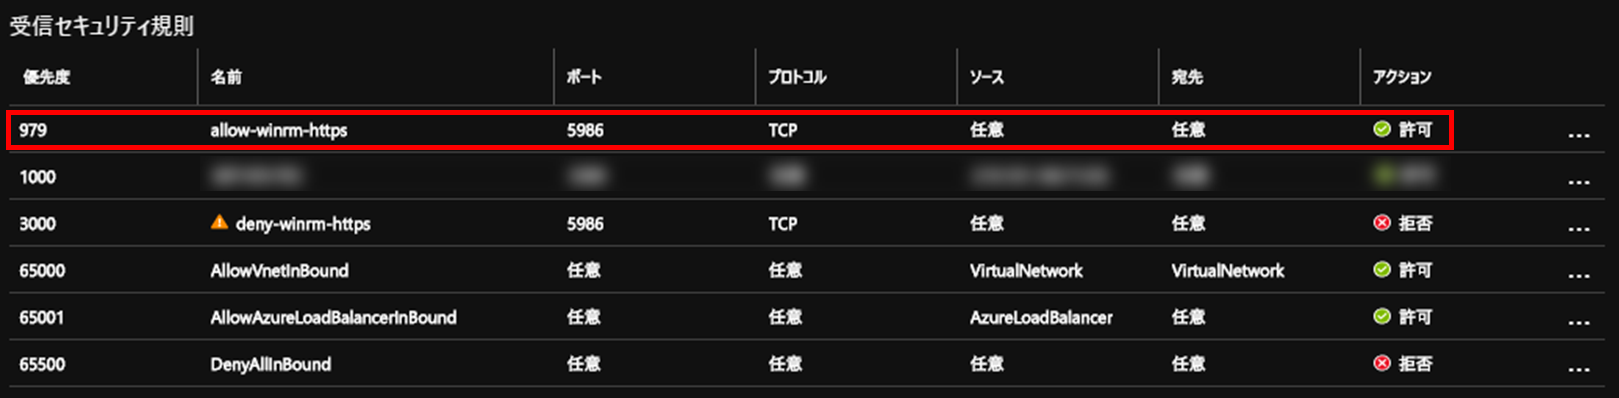
受信セキュリティ規則に「deny-winrm-https」よりも優先度の高い「allow-winrm-https」が作成されています。
「Enable-AzVMPSRemoting」コマンドでは、「allow-winrm-https」という名前の受信セキュリティ規則の有無を確認して、無ければ作成するという動作であることが確認できました。
つまり、「Enable-AzVMPSRemoting」コマンドで「allow-winrm-https」を設定させないためには、予め「allow-winrm-https」という名前の受信セキュリティ規則を作っておくということになります。
ひとまず、NSG の設定で通信を拒否する方法はわかりました。続いて、特定の接続元からの Cloud Shell 接続を許可する方法を確認します。
既定の状態の「allow-winrm-https」では、ソースが「任意」となっています。
NSG で特定の接続元のみを許可したい場合には、ソースの部分を特定の接続元のみに限定すれば良いのですが、ここで 1つ疑問が生まれます。
通信許可を行う接続元の IP アドレスは何になるのでしょうか?
すぐに思い浮かぶのは、「Cloud Shell の実行環境のパブリック IP アドレス」や「Cloud Shell に接続している自クライアントのパブリック IP アドレス」ですが、正解はリモート接続した先の仮想マシンで確認するのが良さそうです。
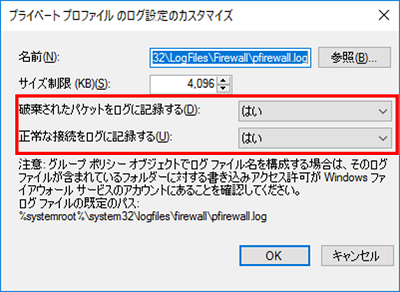
実際に対象の仮想マシンの Windows Firewall のログを有効化して確認します。
続いて、Cloud Shell から対象の仮想マシンへ接続します。
Windows Firewall のログを確認します。
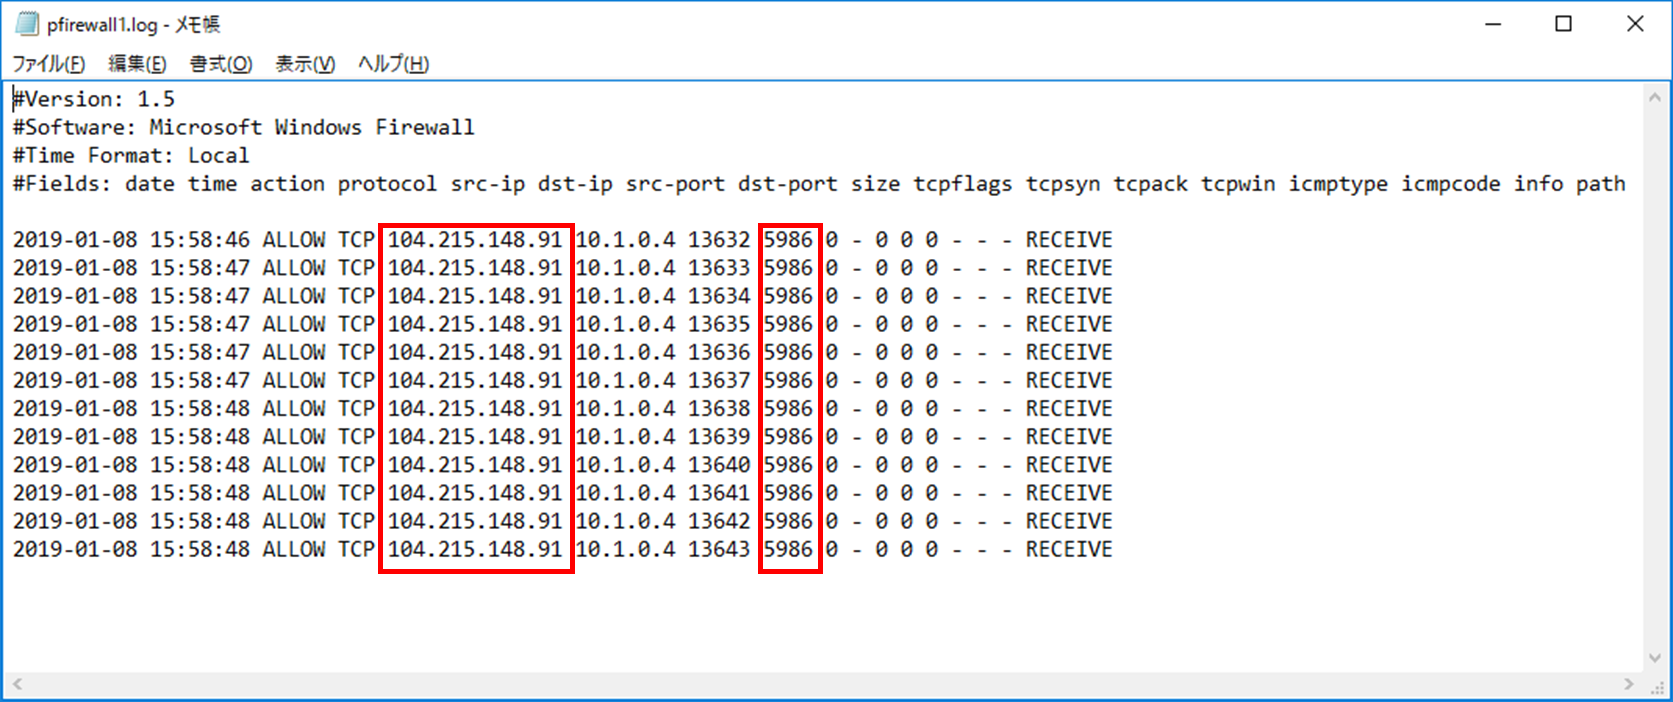
Windows Firewall のログには見知らぬパブリック IP アドレスが記録されていました。
果たしてこれはどこのパブリック IP アドレスなのでしょうか?
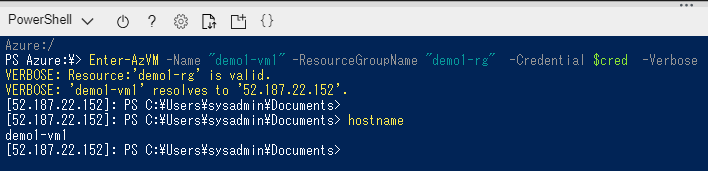
「Cloud Shell の実行環境のパブリック IP アドレス」にアタリをつけて確認してみます。
パブリック IP アドレスの確認は、以下のコマンドで行なえます。
(Invoke-WebRequest inet-ip.info/ip).Content
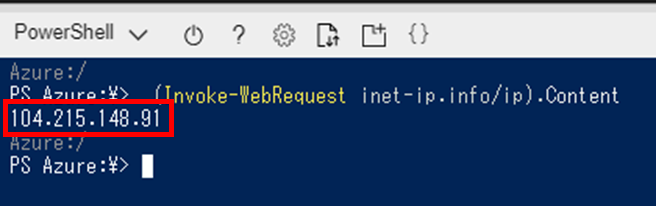
正解でした。
接続元のパブリック IP アドレスが判明したので、この IP アドレスのみ「allow-winrm-https」で「許可」の設定にして接続を試してみます。

エラーとなり接続できませんでした。
NSG の設定変更によって接続ができなくなったため、「allow-winrm-https」に追加の設定が必要と予想されます。
しかしながら、対象の仮想マシンの Windows Firewall のログや NSG の各種ログ(フローログ,イベント,ルールカウンター)を確認しても手掛かりは得られませんでした。
そこで、Azure のサポートに問い合わせてみました。
結果は、”Cloud Shell を利用した仮想マシン接続において、特定の接続元を制限する機能は現在提供していない” とのことでした。
なお、本機能は下記のサイトで既にフィードバックがあがっており、投票数が多くなれば機能開発の優先度が高くなるそうです。
是非とも多くの読者の方に投票していただき、この便利な機能を安全に利用できるようにしていただきたいところです。
https://feedback.azure.com/forums/598699-azure-cloud-shell/suggestions/19446412-allow-cloudshells-to-be-whitelisted-in-network-sec
今回の記事では、Cloud Shell の 「Enable-AzVMPSRemoting」 コマンドで発生する変更点を整理しました。
このコマンドでは、NSG の受信セキュリティ規則に TCP ポート5986宛ての通信を任意の宛先に対して許可してしまうことがわかりました。
これに対しては、「allow-winrm-https」という名前の受信セキュリティ規則を作成し通信を「拒否」する設定することで、NSG への設定変更を回避することができるとわかりました。
しかし、今のところ、特定の接続元を制限する機能が提供されていないため、「allow-winrm-https」を「拒否」すると Cloud Shell を利用した仮想マシンへの接続そのものができなくなるとわかりました。
Cloud Shell による仮想マシン接続は、クライアント環境整備のハードルが低く非常に便利な機能であることは間違いありません。
しかしながら、リリースして日の浅い機能でもあり、実運用での利用を考えた場合にはまだまだ発展途上でもあることが今回わかりました。
この便利な機能の進化に期待を込めつつ、今回のブログ記事はここで締めたいと思います。
それでは、最後までお読みいただきありがとうございました。
次回の記事にご期待ください!